Making a Laminate in Optics
Making a Laminate in Optics
Last Updated:
Thursday, October 5, 2017
Software/Versions Affected:
- Optics›5
- Optics›6
- WINDOW›7
Start Building a New Laminate
When Optics5 starts, you can start building a laminate immediately by switching to the 'Laminate' tab and adding layers (see Add Layers to a Laminate).
If you have created a laminate already, but want to start over with an empty laminate:
- Make sure the 'Laminate' tab is selected
- Choose menu option File|New Laminate
You will be prompted to save the current laminate if one already exists
Note: if you created new layers and did not save the layers or did not save the laminate (which would save any new layers), the new layers will be lost when you start a new laminate
Add Layers to a Laminate
You can add monolithic, coated, applied film and interlayer type layers to a laminate. There are a number of 'rules' for building laminates:
- The first and last layer in a laminate must be a non-interlayer type (e.g. monolithic, coated or applied film)
- You can place as many interlayers as you like adjacent to each other, but you must separate rigid layers non-interlayers with at least one interlayer.
- You must place applied film layers so that the film is on an exterior surface.
- You can only place a coating next to an interlayer if there is sufficient data in the database to perform this operation (see Add Embedded Coatings)
If you break any of these rules, the program will give you a warning message. If you break rule 1 or 2, the operation will be cancelled. If you break rule 3 or 4, the program will try to help you by offering to flip the layer — if the flipped layer cannot be added, the operation will be cancelled.
Use the 'Add Interlayer' tab above the database to add interlayers, and the 'Add Embedded Coating' tab to add a coated layer where the coating will be embedded in the laminate (adjacent to an interlayer). To add other layers, use the 'Add Glazing' tab. Only those database records with enough data to be loaded into a laminate will be shown in these views — if you want to see all records in the database, including those which cannot be used in laminates, use the 'View All' tab. If you try to load an invalid layer into a laminate from the 'View All' view of the database, an error message will be displayed.
Add Glazings to a Laminate
You can add monolithic, coated, applied film and interlayer type layers to a laminate as long as you follow the laminate-building 'rules' (see Add Layers to a Laminate).
To add layers from the current database to a laminate:
- Select the first available (unoccupied) layer in the laminate by clicking on its layer button — if you select an occupied layer, it will be replaced (see Replace a Layer in a Laminate)
- Select the 'Add glazing', 'Add interlayer' or 'Add embedded coating' tab in the database
- Double-click on the layer in the database
or
- Using the mouse, drag the layer from the database over the layer button where you want to add the layer and release the mouse button
or
- Select the layer in the database, then choose the menu option Database|Add/Replace Layer
or
- Select the layer in the database, then right-click to display the pop-up menu then choose Add/Replace Layer
If you are replacing a layer, a dialog box will appear to confirm that you want to replace the existing layer.
Note: Select a layer in the database by clicking on it with the mouse, or by browsing to it by pressing the up and down arrow keys (see Browsing the Databases)
Add Interlayers
To add an interlayer to a laminate:
- Select the first available (unoccupied) layer by clicking on a layer button
- Select the 'Add Interlayer' tab
- Select the interlayer you want to add, and load it into the laminate (see Add Layers to a Laminate)
Add Embedded Coatings
If you want to place a coating adjacent to an interlayer (called an embedded coating), you can only use coatings for which there is additional data in the database (see Note below). To help you find coated layers with coatings that can be used in embedded positions, there is a special view of the database that only contains those layers.
To add a coated layer to a laminate so that the coating is in an embedded position:
- Select the first available (unoccupied) layer by clicking on a layer button
- Select the 'Add Embedded Coating' tab
- Select the coated layer you want to add, and load it into the laminate
- If the layer is not oriented correctly, flip the layer (see Flip Layers in a Laminate)
Note: You can also add coated glazings from the 'Add glazing' tab. If you try to place the coating in an embedded position and sufficient data is not available, a warning message will be displayed and the program will offer to flip the layer so that the coating is placed on one of the surfaces of the laminate.
Note: The same coating has different properties in an embedded position (next to an interlayer) as opposed to a position where it faces an air or gas environment. An additional 'reference laminate' layer must be stored in the IGDB to allow Optics to correctly determine the properties of a coating in an embedded position. Not all manufacturers have supplied this data for all of their coatings, so only some of the coatings represented in the database can be used in an embedded position. For information about submitting reference laminates, see the International Glazing Database: Data Submission Procedure and Reference Manual.
Flip Layers in a Laminate
To flip layers in a laminate:
- Select the layer to flip by clicking a layer button
- Choose the menu option Edit|Flip Layer
or
- Right-click on the layer button to display the pop-up menu and select Flip Layer
If flipping the layer would place a coating or an applied film adjacent to an interlayer, and this would break the laminate-building rules (see Add Layers to a Laminate), a message will appear describing the problem and the operation will be cancelled.
Note: Check the schematic view and the layer spectral averages if you are not sure which way a layer is oriented.
View the Properties of a Laminate
To view the calculated spectral data, spectral averages and other properties of a laminate:
- Select the laminate by clicking on the 'Lamin.' layer button
- The laminate is now the current layer, so its spectral data and spectral averages are displayed in the lower part of the screen
- To view a schematic diagram of the laminate, select the 'Schematic' tab in the upper right part of the screen
- To view the spectral data in a table, choose menu option View|Spectral Data Grid (see Viewing the Spectral Data Grid)
- To view calculation warnings for the laminate data, select the 'Warnings' tab in the upper right part of the screen
- To see more information about the laminate, choose menu option View|View Details (see View Details of Layer)
Replace a Layer in a Laminate
Replace a layer in a laminate in the same way as you would replace a layer in a glazing system — you must respect the laminate-building rules (see Add Layers to a Laminate), or the operation will be cancelled.
You cannot insert layers into a laminate — you must delete and add layers from the interior side of the laminate to modify the structure.
Delete a Layer in a Laminate
You can only delete the last (interior side) layer in a laminate. To delete the last layer:
- Select the last layer by clicking the layer button
- Choose the menu option Edit|Delete Layer
or
- Right-click on the layer button to display the pop-up menu and select Delete Layer
Save a Laminate
To save a laminate to the user database:
- Select the laminate by clicking on the 'Lamin.' layer button
- Click the 'Save' button on the toolbar:
or
- Choose the menu option File|Save filename
or
- Right-click the layer button to display the pop-up menu and select Save filename
Note: To save the laminate under a different name, choose the menu item Save As…
Edit a Laminate
To edit a laminate saved in the IGDB or user database:
- Make sure the 'Laminate' tab is selected above the layer buttons
- Select the 'Edit Laminate' tab in the upper right part of the screen
or
- Choose the menu option File|Edit Laminate
- Load the laminate you wish to edit like you would add a layer (see Add Glazings to a Laminate) into any layer position — the current laminate will be cleared, and the saved laminate loaded.
Note: Some laminates in the databases may not have enough information about their structure or component layers to allow them to be edited. If you attempt to load a laminate for editing which is missing some of this information, an error message will be displayed. The 'Add Laminate' tab restricts the database view to only those database records with valid structural information, but some of these records may still be missing component data.
Note: You cannot edit laminates in 'Glazing' mode, you must switch to 'Laminate' mode first. In order to use the edited laminate in a glazing system, save the laminate to the user database, switch to 'Glazing' mode and re-load the laminate layer into the glazing system from the user database.
Note: You cannot use a laminate as a component of another laminate
Note: You can edit laminates from either the IGDB or the user database, but you must save edited laminates to the user database
Calculation Warnings for Laminates
The optical properties of most laminates without coatings or applied films can be calculated without generating warnings, except that it is likely that some components will not have spectral data across the whole range of the selected wavelength set (see Wavelength Sets), so the wavelength set will be truncated.
When coatings or applied films are used on the external surfaces of the laminate, you may see a few calculation warnings associated with 'stripping' the coating from its substrate in order to recombine it with the other layers in the laminate. Unlike layer transformations, if the substrate is transmitting these warnings are more likely since the coating can be 'seen' through the opposite side of the laminate. If the substrate is less transmitting, any unreliable reflectance values are hidden behind the substrate and other layers in the laminate.
When you place an embedded coating in a laminate, you may see calculation warnings associated with extracting the coating properties from a special 'reference laminate'. This operation relies on all the components of the reference laminate being transparent, so that the coating can be 'seen' through both sides of the laminate. Where the substrate, interlayer or opposing lite of the reference laminate has a higher absorption than the components you are using to construct your own laminate, you may see calculation warnings.
Viewing Calculation Warnings for Laminates
If you transform a layer in a laminate, you may see warnings associated with the transformation operation (see Calculation Warnings for Transformed Layers). Calculating laminate properties also involves 'extracting' and re-combining the optical properties of individual components, and may result in some calculation warnings being generated.
To view calculation warnings for a laminate:
- Select the laminate by clicking on the 'Lamin.' layer button
- Select the 'Warnings' tab
Wavelength Sets
Laminate data is calculated for each wavelength in the selected wavelength set for which there is data available.
To select the wavelength set used to calculate laminate data:
- Choose the menu option Tools|Select Wavelength Set and make a selection
The default wavelength set (Optics5) contains the minimum required set of wavelengths for solar data required for layers in the IGDB, plus the minimum required set of wavelengths for IR data out to 40 mm. If you want to calculate laminate data on a different wavelength set, you will first need to create your own wavelength set file (copy the Optics5.wvl file in the Standards directory, rename the copy and edit it). The next time you start Optics5, the file will be available under the menu option Tools|Select Wavelength Set.
Note: data is often not available for all layers at all wavelengths in the selected wavelength set — in this case, the first line in the 'Warnings' tab for a laminate will explain that the calculated data set was truncated to the region where data was available for all layers:
Calculation Warnings for Transformed Layers
Most layer transformations will result in warnings about unreliable data at one or more wavelengths. To minimize the number of unreliable data points, follow the guidelines under "Getting the Best Results…" for each layer transformation. Experiment with different layers, sometimes results can be improved by using different combinations of layers.
Warnings in the UV region are very common, because most substrate materials are absorbing in this region, and it is difficult to extract reliable optical properties from the substrate, coatings or applied films in this case to perform transformation operations. Be aware that if the calculated spectral data is unreliable in the UV region, spectral averages that cover that region will also be unreliable.
Very absorbing substrates (e.g. strongly body-tinted materials) will also cause difficulties in transformations if you attempt to extract coating or applied film properties from a glazing with an absorbing substrate.
Don't forget that you can save calculation warnings to a file (see Save Layer or System Calculation Warnings to a File).
Save Layer or System Calculation Warnings to a File
You can export the warnings generated for any layer to a text file in order to review them later.
To export warnings to a file:
- Select the layer or laminate that the warnings apply to
- Choose the menu option File|Export filename Warnings File
- Choose a name and location for the file, Click 'OK'
Viewing the Spectral Data Grid
To view the spectral data of the currently selected layer as a grid:
- Choose menu option View|Spectral Data Grid
or
- Press the spectral data grid toolbar button:

- The spectral data grid will be displayed:
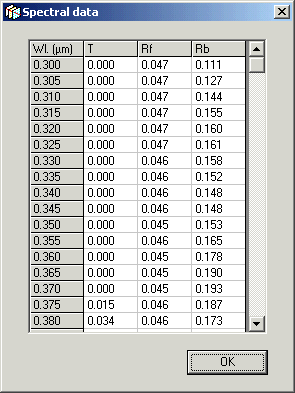
You can scroll through the spectral data. Press 'OK' to close the window.
View Details of Layer
You can view the most commonly referenced database information fields for the currently selected layer by:
- Choose menu option View|View Details
or
- Press the view details toolbar button:

- The 'View Details' dialog box will be displayed — it looks like the left-hand side of the 'Change Glazing' dialog box (see The Change Glazing Dialog Box)
Note: You cannot edit any of the fields in the 'View Details' dialog box - if you want to edit these details, you must load the layer if it is not already loaded, then use the menu option Edit|Change Details
The Change Glazing Dialog Box
The Change Glazing dialog box is used to enter new information when transforming layers or editing information fields for a layer:

The left side of the dialog box shows the details of the current layer — the right side of the dialog box shows the details of the modified layer. Fields you can edit are shaded blue. Hold the cursor over each blue field for a tool tip describing how you can edit that field (some fields use drop-down lists or pop-up browsers to select from a range of values). When you have finished modifying the fields, click 'OK' to create the modified glazing. If you enter an invalid value in a field, you will receive a message telling you what the problem is immediately or when you try to commit the changes.
Browsing the Databases
You can browse through glazings in the database in several ways:
- Use the grouping and sorting features to organize the database (see Grouping and Sorting topics in the Optics Help file) — expand any group by clicking on the '+' sign next to the group heading
- Use the mouse to scroll up and down the list of glazings displayed
or
- Use the up and down arrow keys on the keyboard to move up and down the list of glazings
The currently selected glazing will be highlighted in the database, and its spectral averages and spectral data graph will appear in the lower part of the screen.
You can scroll across to view all the display fields in the database using the scroll bar under the database — the 'Filename' and 'Type' fields do not scroll. You can also re-size any of the columns to make them easier to read by dragging the column dividers left or right, but this setting is not saved if you change views of the database.
You can also view different sub-sets of the database depending on what operation you want to perform next by using the different tabs above the database. See Add Layers to a Glazing System and Add Layers to a Laminate for more details. You can see all layers in the database by using the 'View All' tab.
Add Layers to a Glazing System
You can add monolithic, coated, applied film, laminate and unknown type layers to a glazing system.
To add layers from the current database to a glazing system:
- Select the first available (unoccupied) layer in the glazing system by clicking on its layer button — if you select an occupied layer, it will be replaced (see Replace a Layer in a Glazing System)
- Select the 'Add glazing' tab in the database
- Double-click on the layer in the database
or
- Using the mouse, drag the layer from the database over the layer button where you want to add the layer and release the mouse button
or
- Select the layer in the database, then choose the menu option Database|Add/Replace Layer
or
- Select the layer in the database, then right-click to display the pop-up menu then choose Add/Replace Layer
If you are replacing a layer, a dialog box will appear to confirm that you want to replace the existing layer.
Note: Select a layer in the database by clicking on it with the mouse, or by browsing to it by pressing the up and down arrow keys (see Browsing the Databases)
Replace a Layer in a Glazing System
To replace a layer in a glazing system with another layer from the database:
- Select the layer to replace by clicking on the layer button
- Select a layer from the database
- Choose the menu option Database|Add/Replace Layer
or
- Right-click the layer in the database to display the pop-up menu and select Add/Replace Layer
- The program will ask you to confirm the replacement
Note: 'Film' type glazings are adhesive-backed films that must be combined with a rigid substrate to form an 'Applied Film' layer before they can be added to a glazing system (see Optics Help file under the topic Creating an Applied Film Layer) or laminate.